ERAS Application for Residency: The Definitive Guide (2025)
Master the ERAS application in this step-by-step guide to completing the ERAS application for residency!

----
Part 1: Introduction
At some point during your third year of medical school, you’ll likely begin to gain a clearer understanding of which specialty you want to pursue for your residency and future career. With a variety of options available, you might even think about applying to more than one type of residency program. Depending on the specialty you select and where you want to undertake your residency, you may find yourself getting ready to complete an application through the Electronic Residency Application Service (ERAS).
ERAS is a streamlined and centralized system that enables you to apply to multiple residency programs simultaneously. Think of it as a one-stop shop since you only need to fill out one ERAS application, which will then be sent to the programs you choose. It operates similarly to AMCAS, which allows you to apply to multiple medical schools with a single application. Through your MyERAS account, you can apply to programs, store and upload necessary documents (like your ERAS letters of recommendation), and track your application results.
Not all residency programs participate in the ERAS system, so you’ll need to look at the list of ERAS Participating Specialties and Programs to determine whether you’ll apply to your programs through ERAS. For the 2026 application season, 62 specialties are participating in ERAS. (If you see your specialty on the Participating Specialties and Programs page, simply click the specialty name to reveal a complete list of specific programs that are participating.)
In this guide, we’ll walk you through completing the ERAS application step by step. We’ll take a look inside the MyERAS platform so you know what to expect, and we’ll discuss updates for the 2026 ERAS application season along the way.
----
Part 2: The ERAS application step by step
Step 1 - Obtain a residency token
Before you can access the MyERAS website, you’ll need to obtain a residency token from your Designated Dean's Office. You’ll then use this token to register on MyERAS, and you can begin the application process.
Step 2 - Complete your MyERAS application
Once you’ve registered at MyERAS, you’ll be taken to your Dashboard, and you can now officially complete your ERAS application.
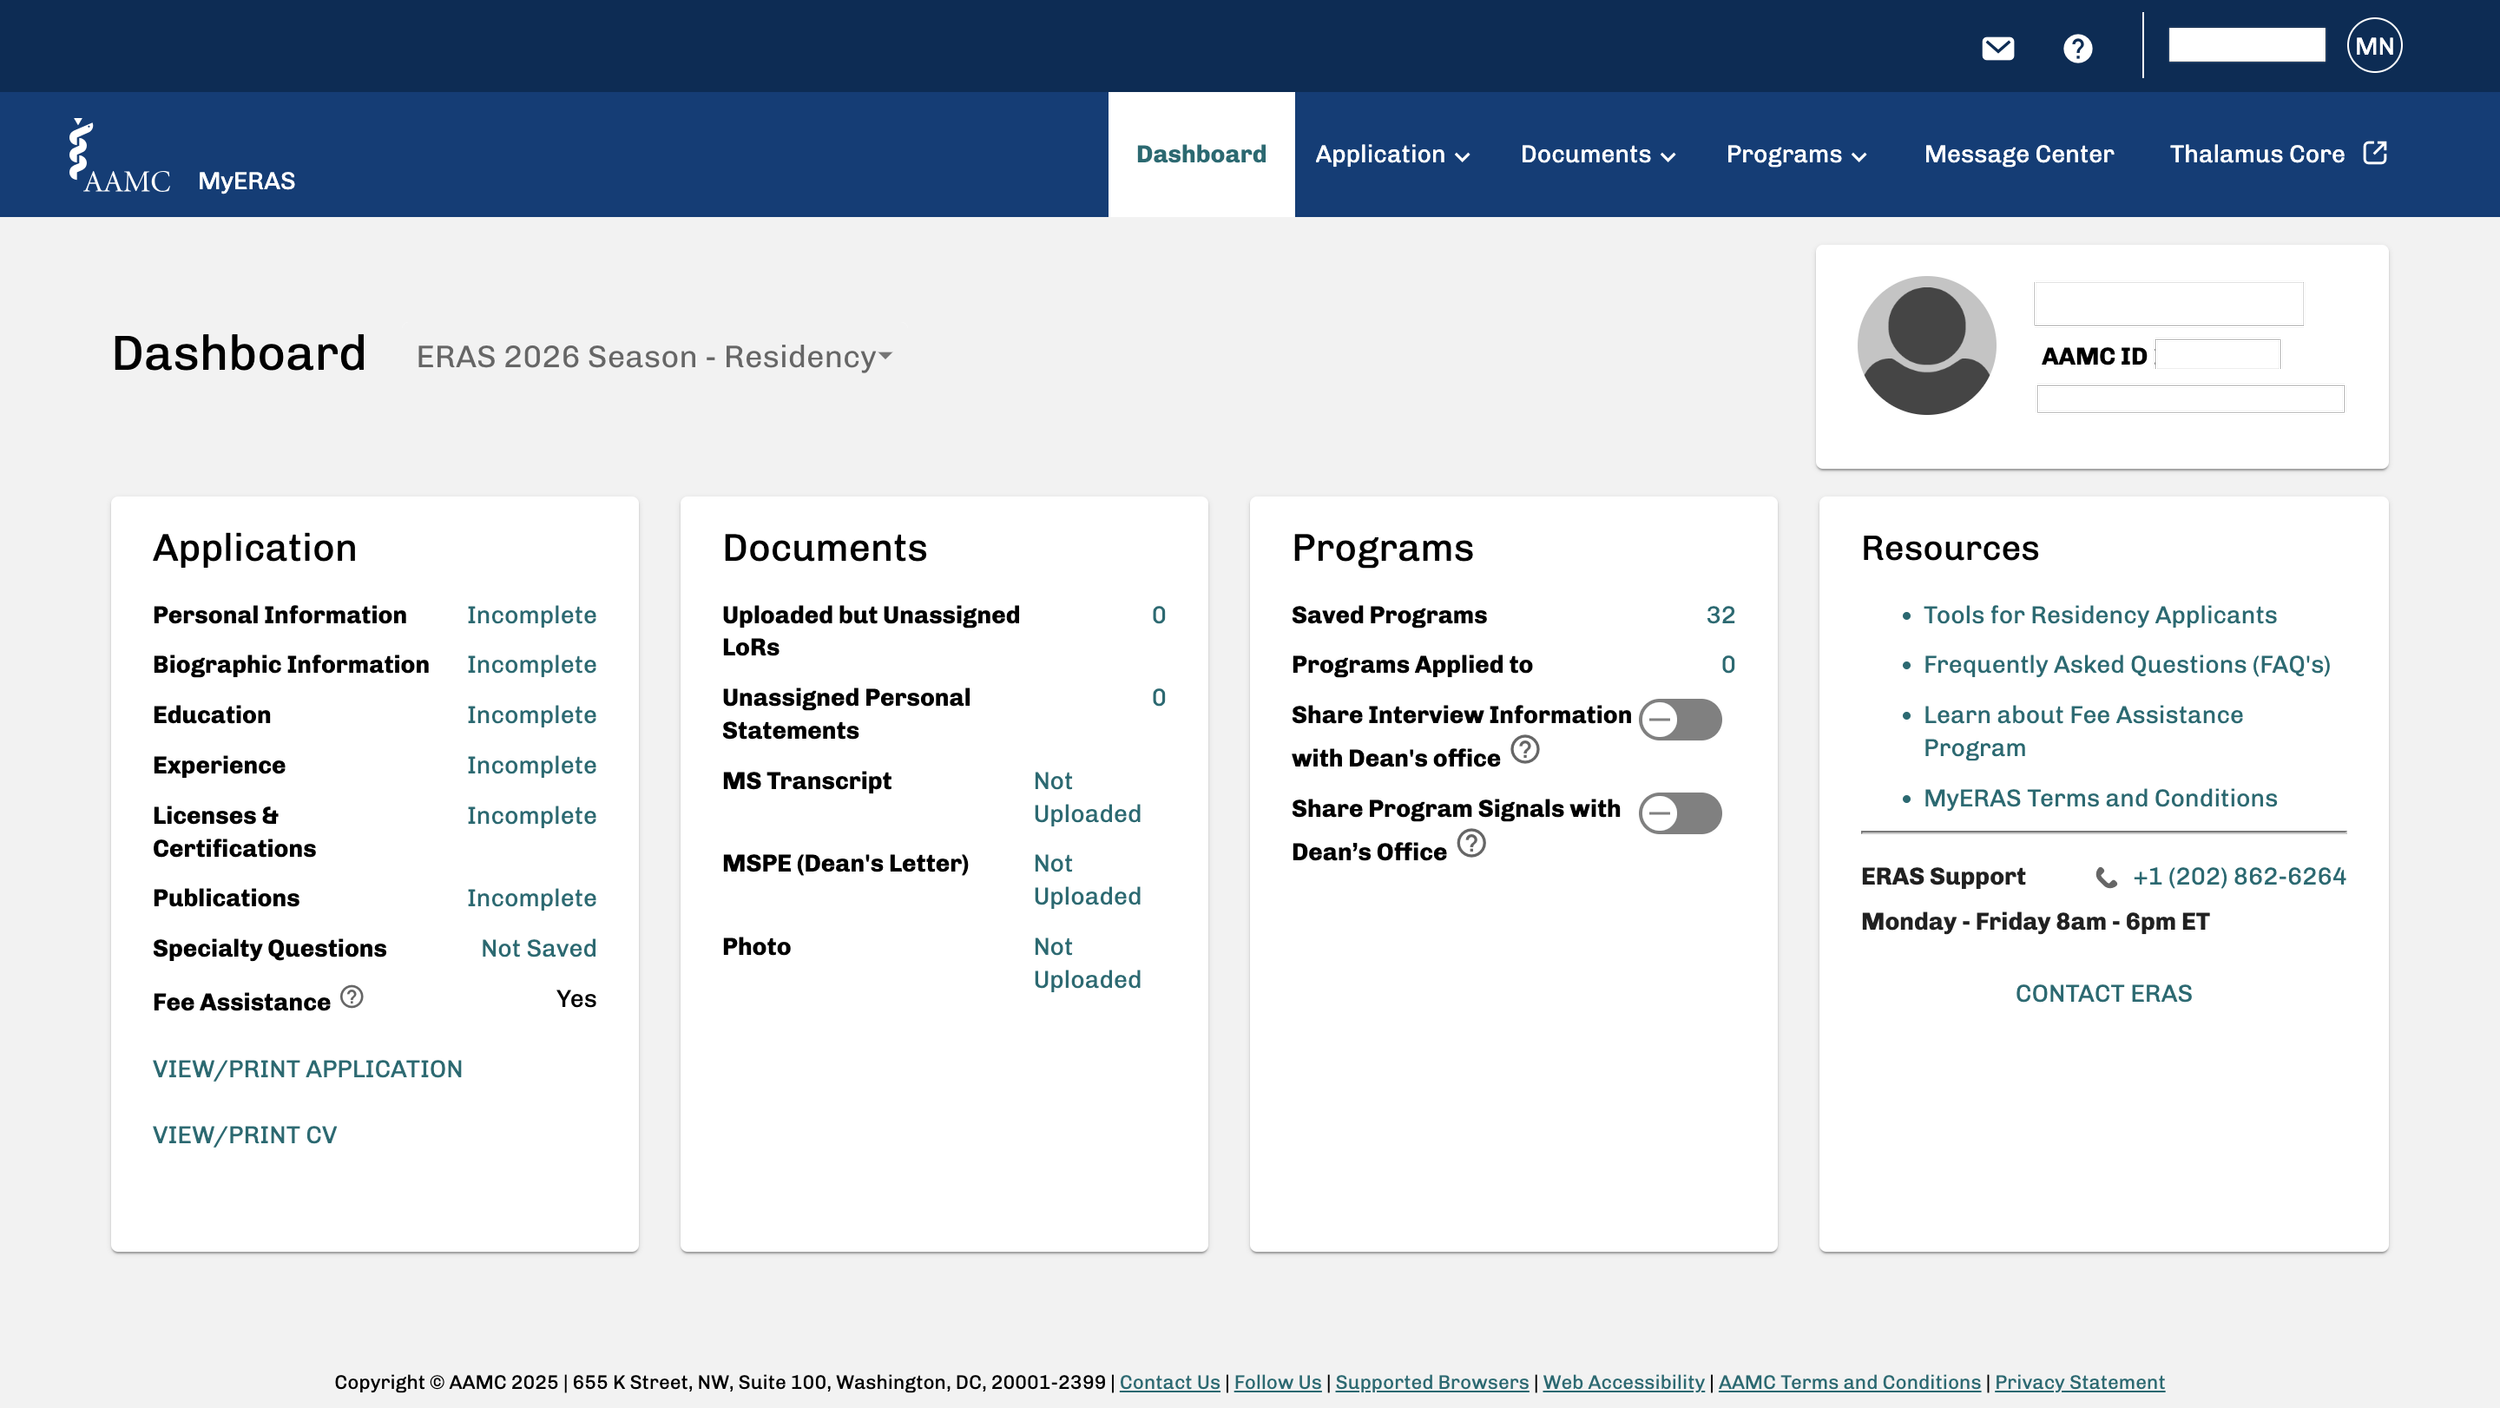
In this guide, we’ll walk you through completing your ERAS application in the order in which the sections appear on your Dashboard.
Personal Information
The first section you’ll fill out is Personal Information. Here, you’ll complete the following subsections:
AAMC Account Information
Basic Information
Address
Work Authorization
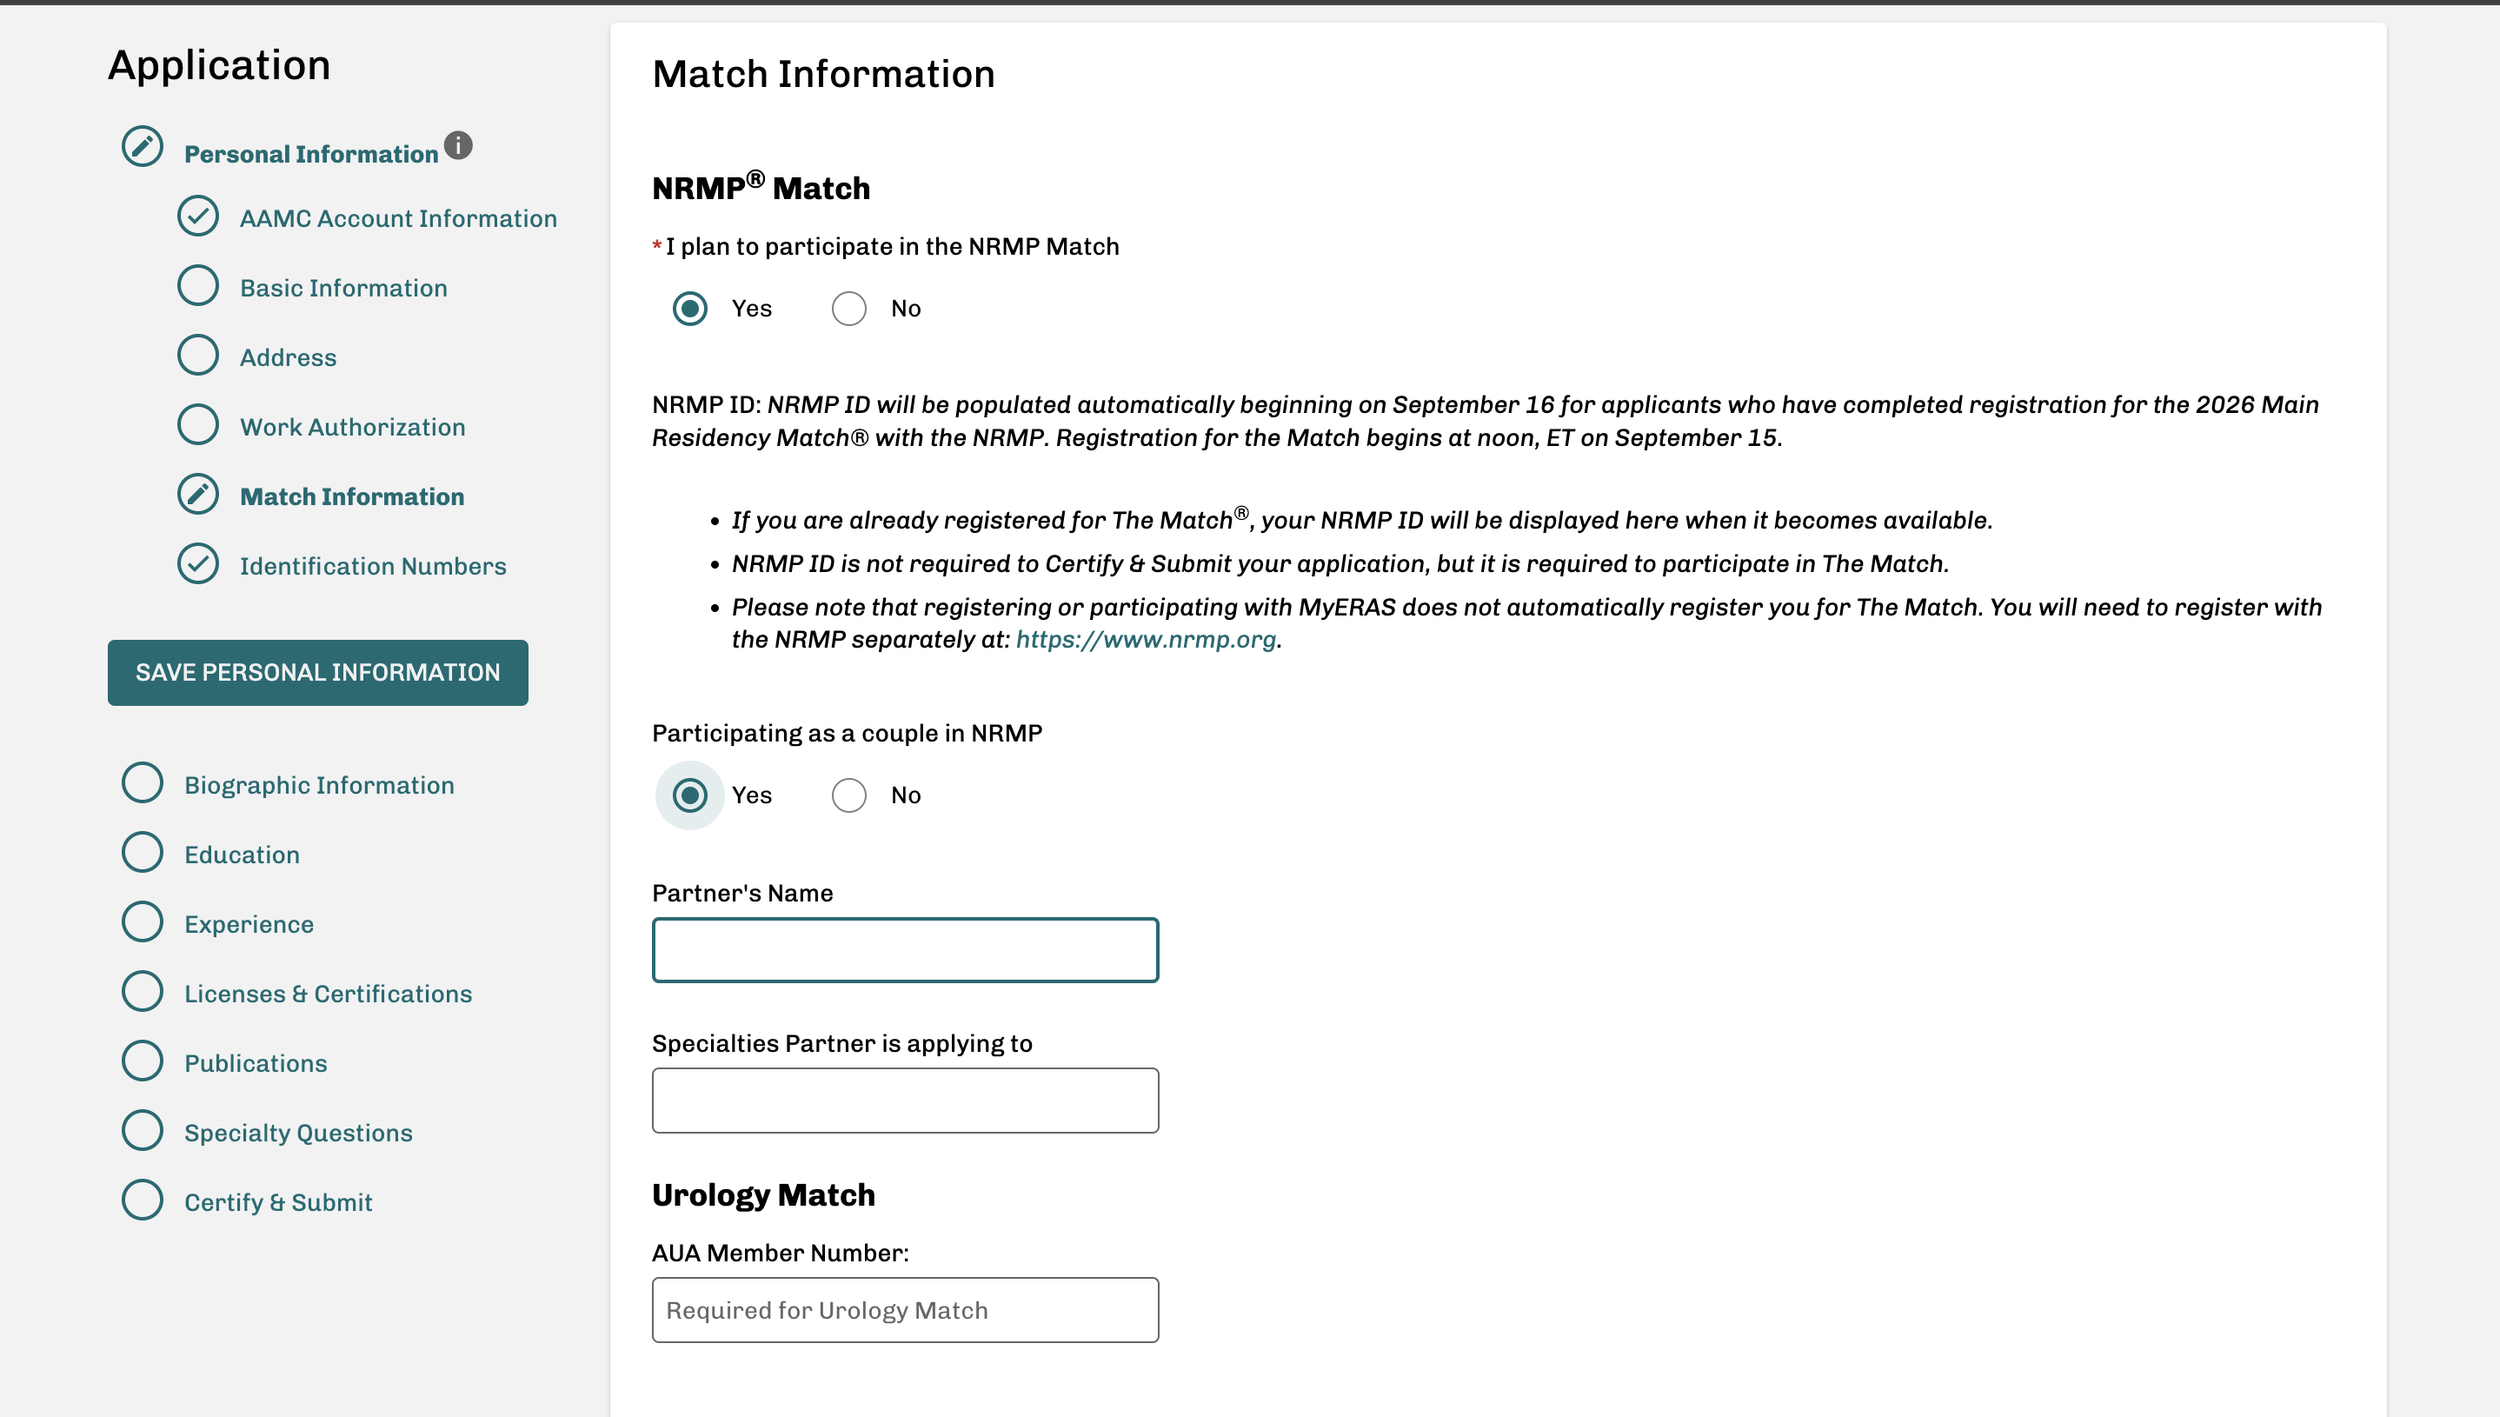
Match Information
Identification Numbers
Most of the information you’ll provide for these sections will be self-explanatory. However, there is one significant section to pay attention to: Match Information. If you are applying for the Couples Match, you’ll want to indicate that in this section.
Biographic Information
Next, you’ll complete the Biographic Information section. Here are the subsections and any important pieces of information you’ll need to know for each:
Self-Identification: More options were added for 2026.
Language Proficiency:
This section was updated for the 2026 application season.
Now, you are provided with detailed descriptions of what each option means, and then you are asked if you meet or exceed the Advanced level of proficiency for English.
They also no longer ask about proficiency levels for each language that you add.
Military Information: Complete this as it applies to you.
Geographic Preferences:
This section used to be a part of the Supplemental ERAS Application, but now that that’s been done away with, this section was worked into the ERAS application.
You can choose up to three divisions.
If you choose “I do not have a division preference,” then all locations you apply to will be able to see that you’ve chosen “I do not have a division preference.”
For each division you choose, that division will be notified that you chose its division, but the other divisions will not know what you choose.
If you choose a division, be prepared to explain (in 300 characters or less) why you are choosing that particular division.
If you’re unsure about how to complete this section or would like advice on whether to choose a preference, our experienced advisors are happy to assist you.
Setting Preference: Choose the type of setting you prefer (or indicate your lack of preference).
Hometown(s): You can enter up to three hometowns.
Education
In this section, you’ll see the following subsections to complete:
Higher Education:
You’ll have the option to include multiple schools for Undergraduate and Graduate institutions.
If you graduated from a non-U.S. medical school, you’ll likely select “None.” However, if this section applies to you because you attended a college or university prior to medical school, you’ll enter your schools.
Medical Education:
Enter information for the medical school(s) you attended and when you did so.
For Dates of Education, start with the month and year you began attending medical school and conclude with the month and year of your last final exam.
In many instances, the time span during which you attended medical school does not coincide with the date you earned your degree. Therefore, you’ll likely have a different date for “Degree Month/Year.”
Postgraduate Training:
Pay particular attention to the specific types of residencies or fellowships that are listed here and only include those types of applicable. Those are the only options that will appear in the drop-down menu as you enter your residency or fellowship, so it’s important not to include anything outside of that list.
If you completed a residency in another country and it is not one of the listed types, you’ll list it as an “Experience” in a later section.
Extensions and Interruptions:
This section is only for serious extensions or lengthy interruptions that are unplanned and professional or academic. (This section no longer warrants responding concerning health- or disability-related matters.)
Judiciously think about what you include in this section, since completing this section could potentially hinder your chances of acceptance into a program. Don’t count something as an “interruption” that only caused you to miss a week or two of school throughout your whole undergraduate journey.
If you select “Yes,” be prepared to explain the reason, the timeframe it occurred, what steps you took to address the situation, and what you learned from the situation in 510 characters or fewer.
Honors and Awards:
Previously located in the Personal Information section, this subsection is where you’ll share what—if any—Honor Societies or Awards you’ve received.
With regards to Honor Societies, ERAS is concerned with your status for the Alpha Omega Alpha Honor Society and the Gold Humanism Honor Society. Use the drop-down menus to select your status for either/both of these.
Add any additional honors or awards you’ve received by clicking “Add Entry,” selecting the award type, and entering the name of the honor or award. You’ll also need to add the date you received it and a brief description of it (in 100 characters or fewer).
Professional Memberships: Add any current memberships you have in professional organizations, associations, or societies. While you aren’t required to include dates, it doesn’t hurt to do so.
Experiences
The Experiences section is arguably the most impactful section of the entire ERAS application. In this section, you’ll have the opportunity to really communicate who you are and what you’re passionate about, so carefully decide which experiences you’re going to include.

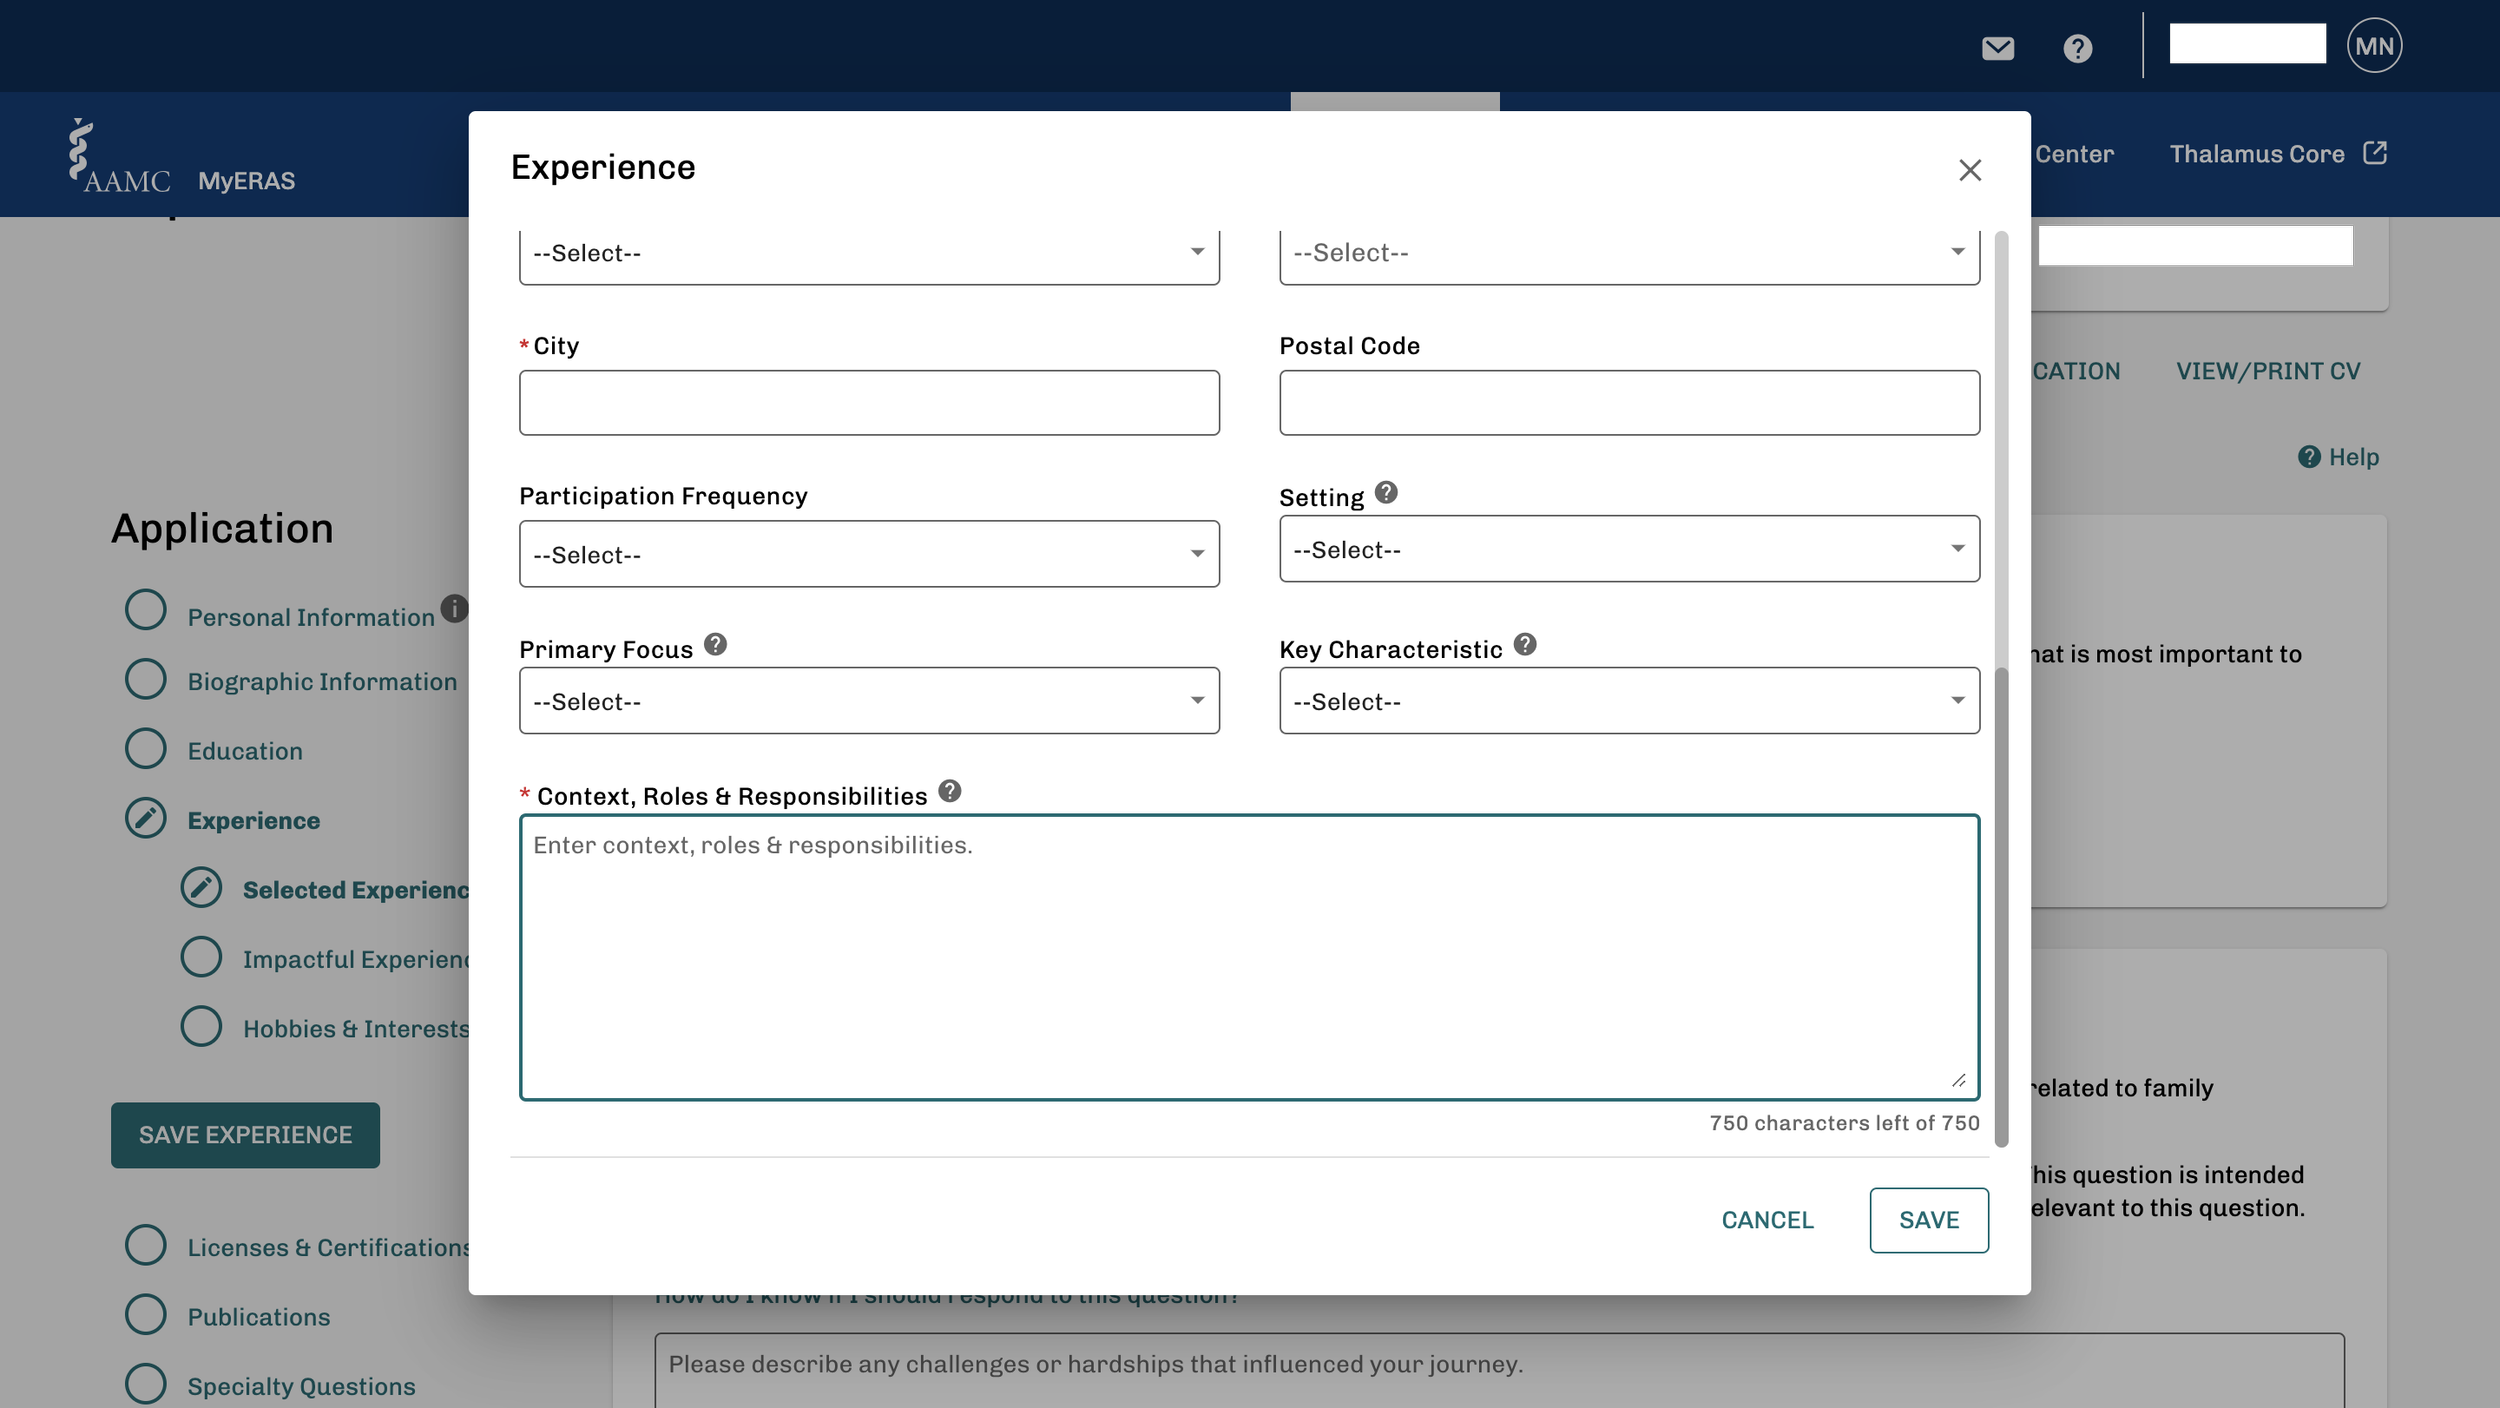
Selected Experiences:
You may identify and include up to 10 experiences. Of those, you will need to be prepared to select up to three as your “most meaningful experiences.”
For each experience you want to include, click “Add Entry” and complete the form that pops up. You’ll include the organization name, the experience type, your position title, whether you’re currently working in that role, and the start/end dates. Next, you’ll add the country, state, city, and postal code. Then, you’ll select the participation frequency, setting, primary focus, and key characteristics. Finally, you’ll enter a description (in 750 characters or fewer) of the context, roles, and responsibilities.
NOTE: Although not all of the fields mentioned above are required, we recommend completing all of them and providing as much detail as possible about each experience. You’ve chosen to include the experience because you deemed it impactful. Don’t skimp on the details! If necessary, save your work and return to your application at a later time.
PRO TIP: Use bullet points as you complete the description. Program Directors have thousands of applications to sort through, each with its own set of experiences to read. Make your application stand out (and easier to read) by using bullet points to describe your role. You can begin each bullet with an actionable word and cut down on “fluff,” which is very important in a field with a limited character count.
Carefully consider your role in the organization as you mull over which experiences are worth including and which are not. For instance, if you had a more passive role in an organization, it might not be worth including, even if the group itself sounds “impressive.” On the other hand, if you played a significant role in the organization, it could be one you’d like to include. Suppose you organized events or coordinated with other groups and ran a program for the community through the organization. Regardless of your official title within the organization, that'd likely be something you’d want to include, as it demonstrates leadership.
Undoubtedly, you’ve had many, many experiences over the years. If you’re struggling to decide which you should include or which to deem “most meaningful,” we’d be honored to provide you with one-on-one assistance in putting this section together!
Most meaningful experiences: Once you’ve finished adding your Selected Experiences, choose up to three that you want to declare as “Most meaningful” and tick the box(es) next to those experiences.
A box will pop up for you to describe (in 300 characters or fewer) each experience you designate “most meaningful.”
Consider the experience and how it influenced you as you complete the description. Do not merely repeat what you did or even the skills you learned. Instead, use this space to outline why that experience was meaningful to you.
NOTE: As you select your “most meaningful experiences,” you should only include experiences from high school or college that were foundational to developing the person you are today.
Impactful Experience:
Use this space to share (in 750 characters or fewer) any challenges or major struggles that you have had to overcome on your path to residency. Possible topics include family, finances, your community setting, educational challenges, or general life challenges.
NOTE: Not every applicant will complete this section. Some applicants may not have faced any significant challenges, while others may simply not feel comfortable sharing the challenges they overcame. This is not a mandatory field to complete; only complete it if it applies to you and you feel comfortable doing so.
Hobbies and Interests:
Mention hobbies and interests that you have. You will have up to 300 characters to complete this section, and you should be prepared to discuss anything listed here in an interview.
Licenses and Certifications
In this section, you’ll list any state medical licenses you have, and then you’ll answer some additional questions. Next, you’ll answer a question about Board Certification and a question about other certifications (be prepared to provide basic details about any certifications you may have). Finally, you’ll provide your DEA registration number.
Publications
If you have publications to include, this is the section to do so. If you do not have any, click “None.” To include publications, click “Add Entry” and complete the form that pops up. (You’ll do this for each publication.)
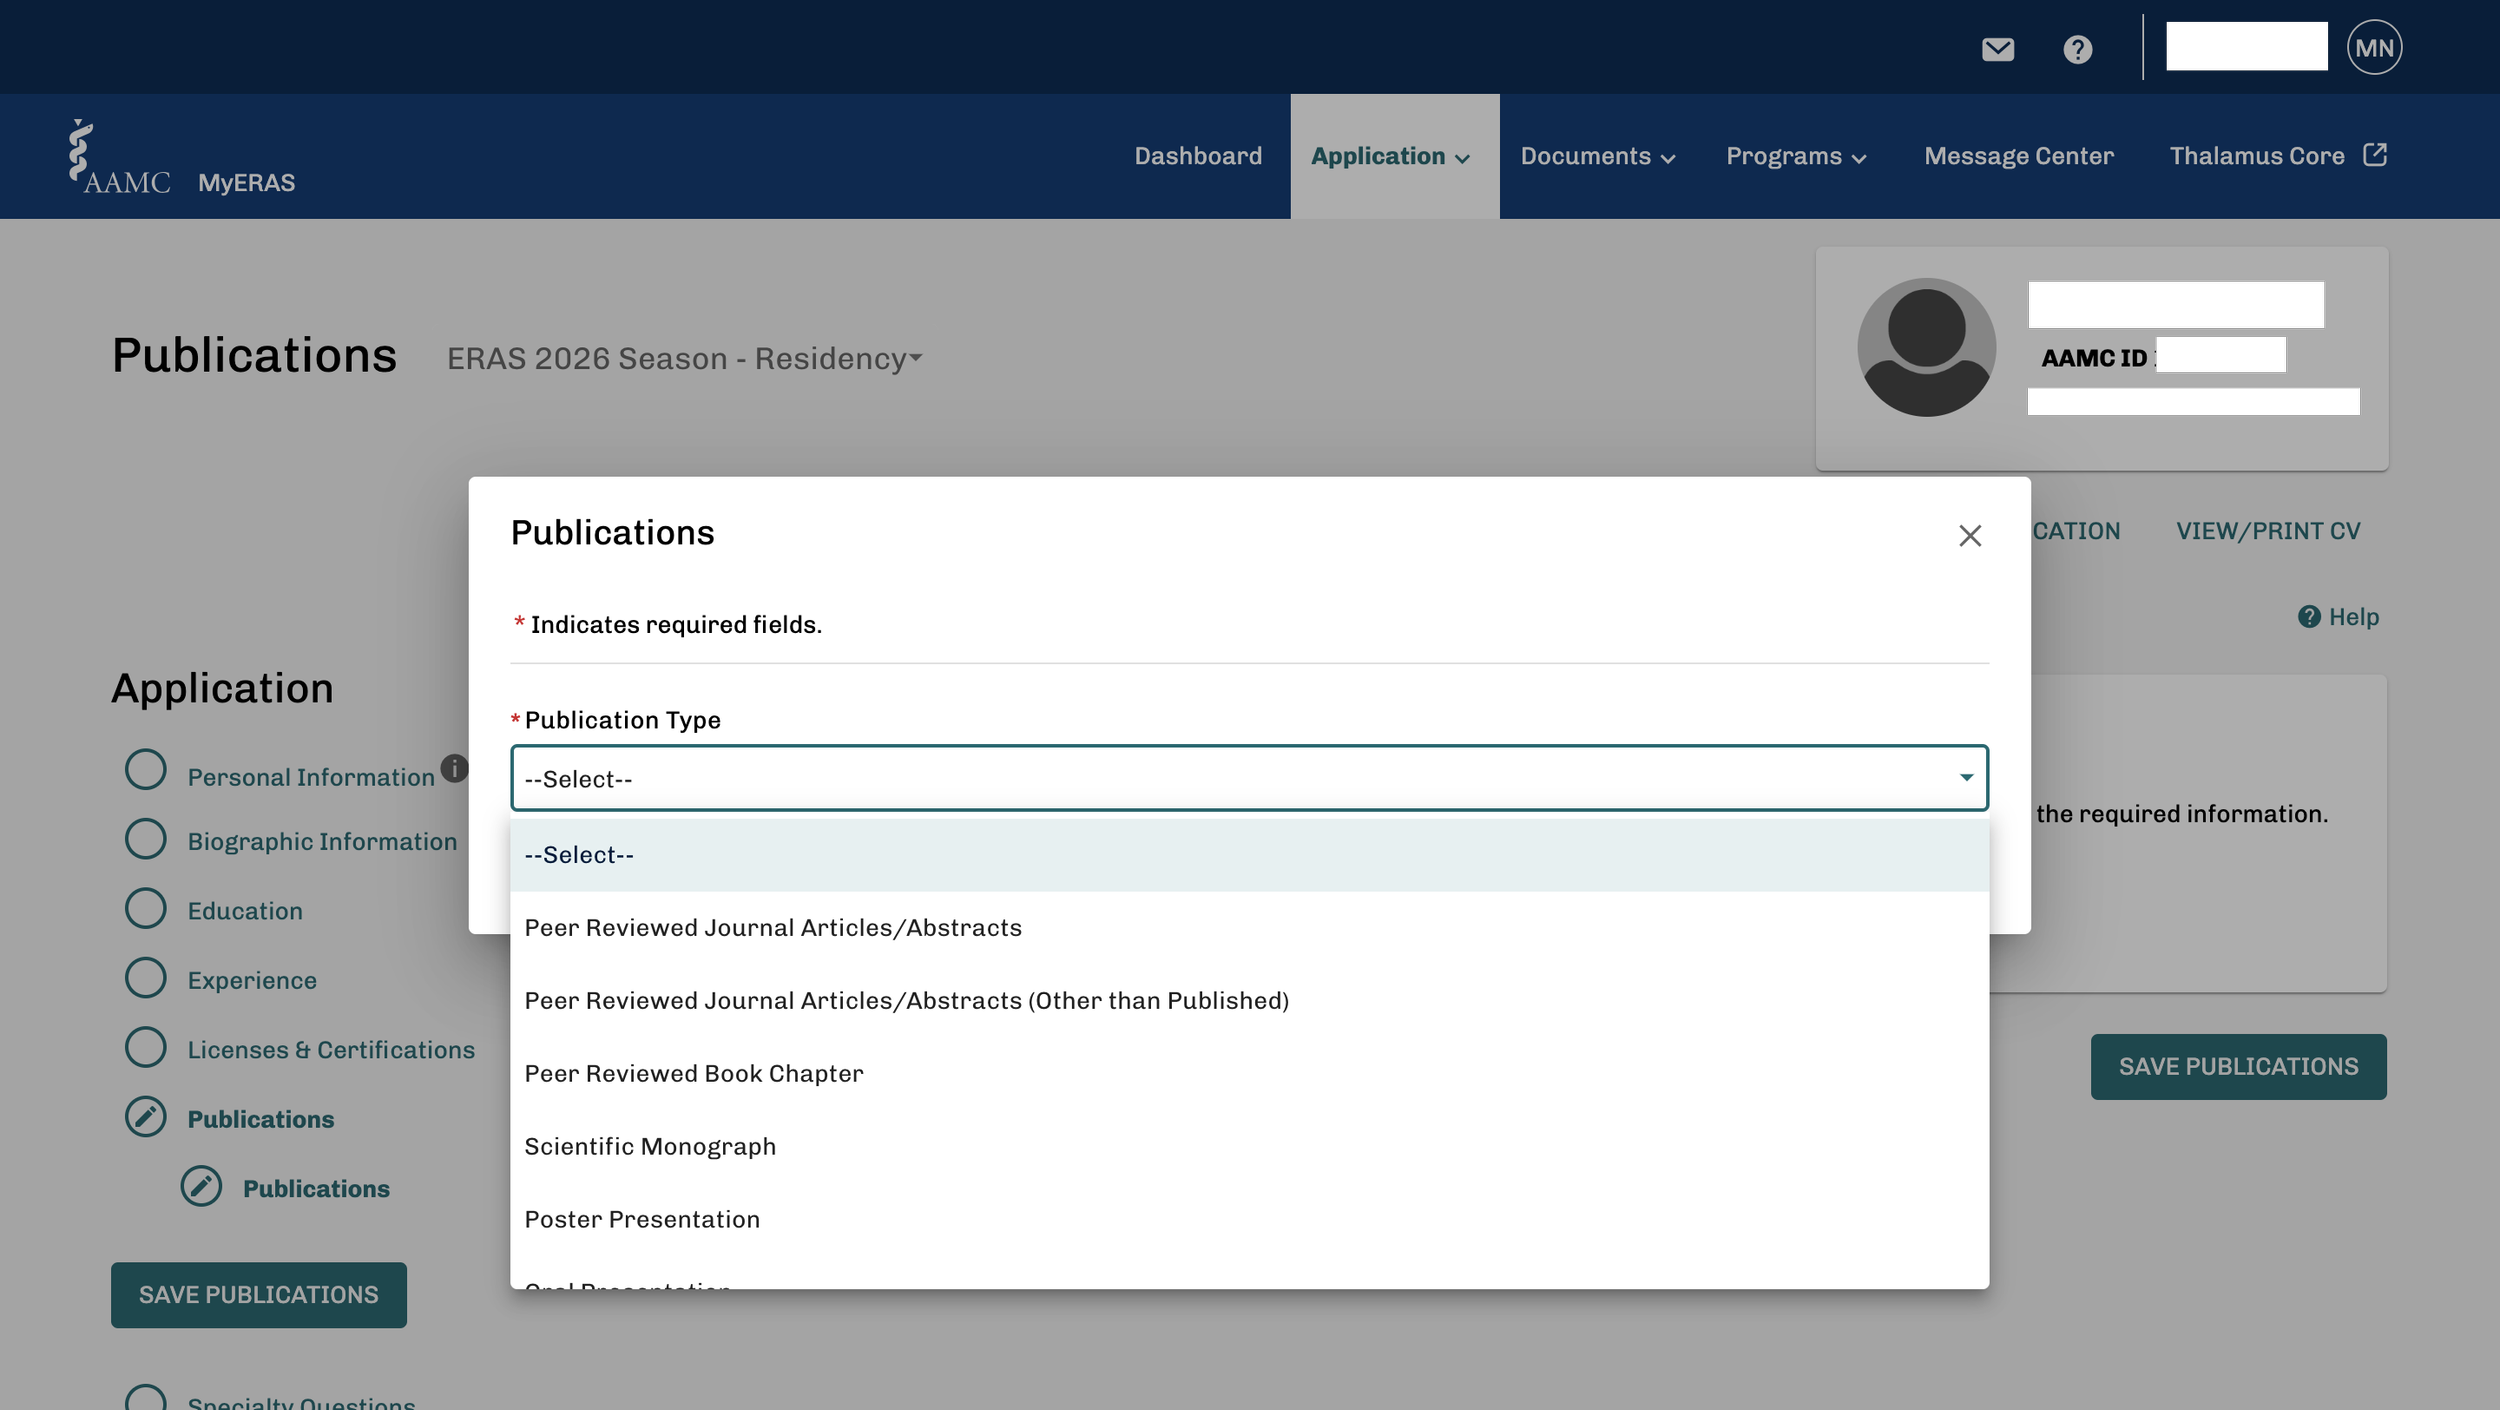
NOTE: For Peer-reviewed publications, you can include articles that have not yet been published.
Choose the option for Peer Reviewed Journals/Articles/Abstracts (Other than Published), then use the dropdown menu to note the publication status (e.g., submitted, under review, accepted/in-press, etc.).
Certify and Submit
This is your chance to review and, if necessary, make changes to your ERAS application. It is essential to note that once you have certified your application, it will be locked, and you will not be able to make any changes to it. The only exception to this is the Personal Information section, which remains editable even after certifying.
Review the Applicant Checklist provided to you, and take the time to proofread the various parts of your application. The Applicant Checklist will note any sections where you may have inadvertently left a required field blank, and you will have the opportunity to return to and complete that section. Once you certify your application, it will be sent to the programs to which you are applying.
Want expert guidance on residency admissions?
Enter your name and email for high-yield admissions strategies we use to help students match into their top-choice programs
----
Part 3: Requesting letters of recommendation through ERAS
You can submit your ERAS application even if all of your LORs haven’t been uploaded. Additionally, you can use the MyERAS platform to generate requests for the letters of recommendation that you’ll need. Here’s how you’ll do that:
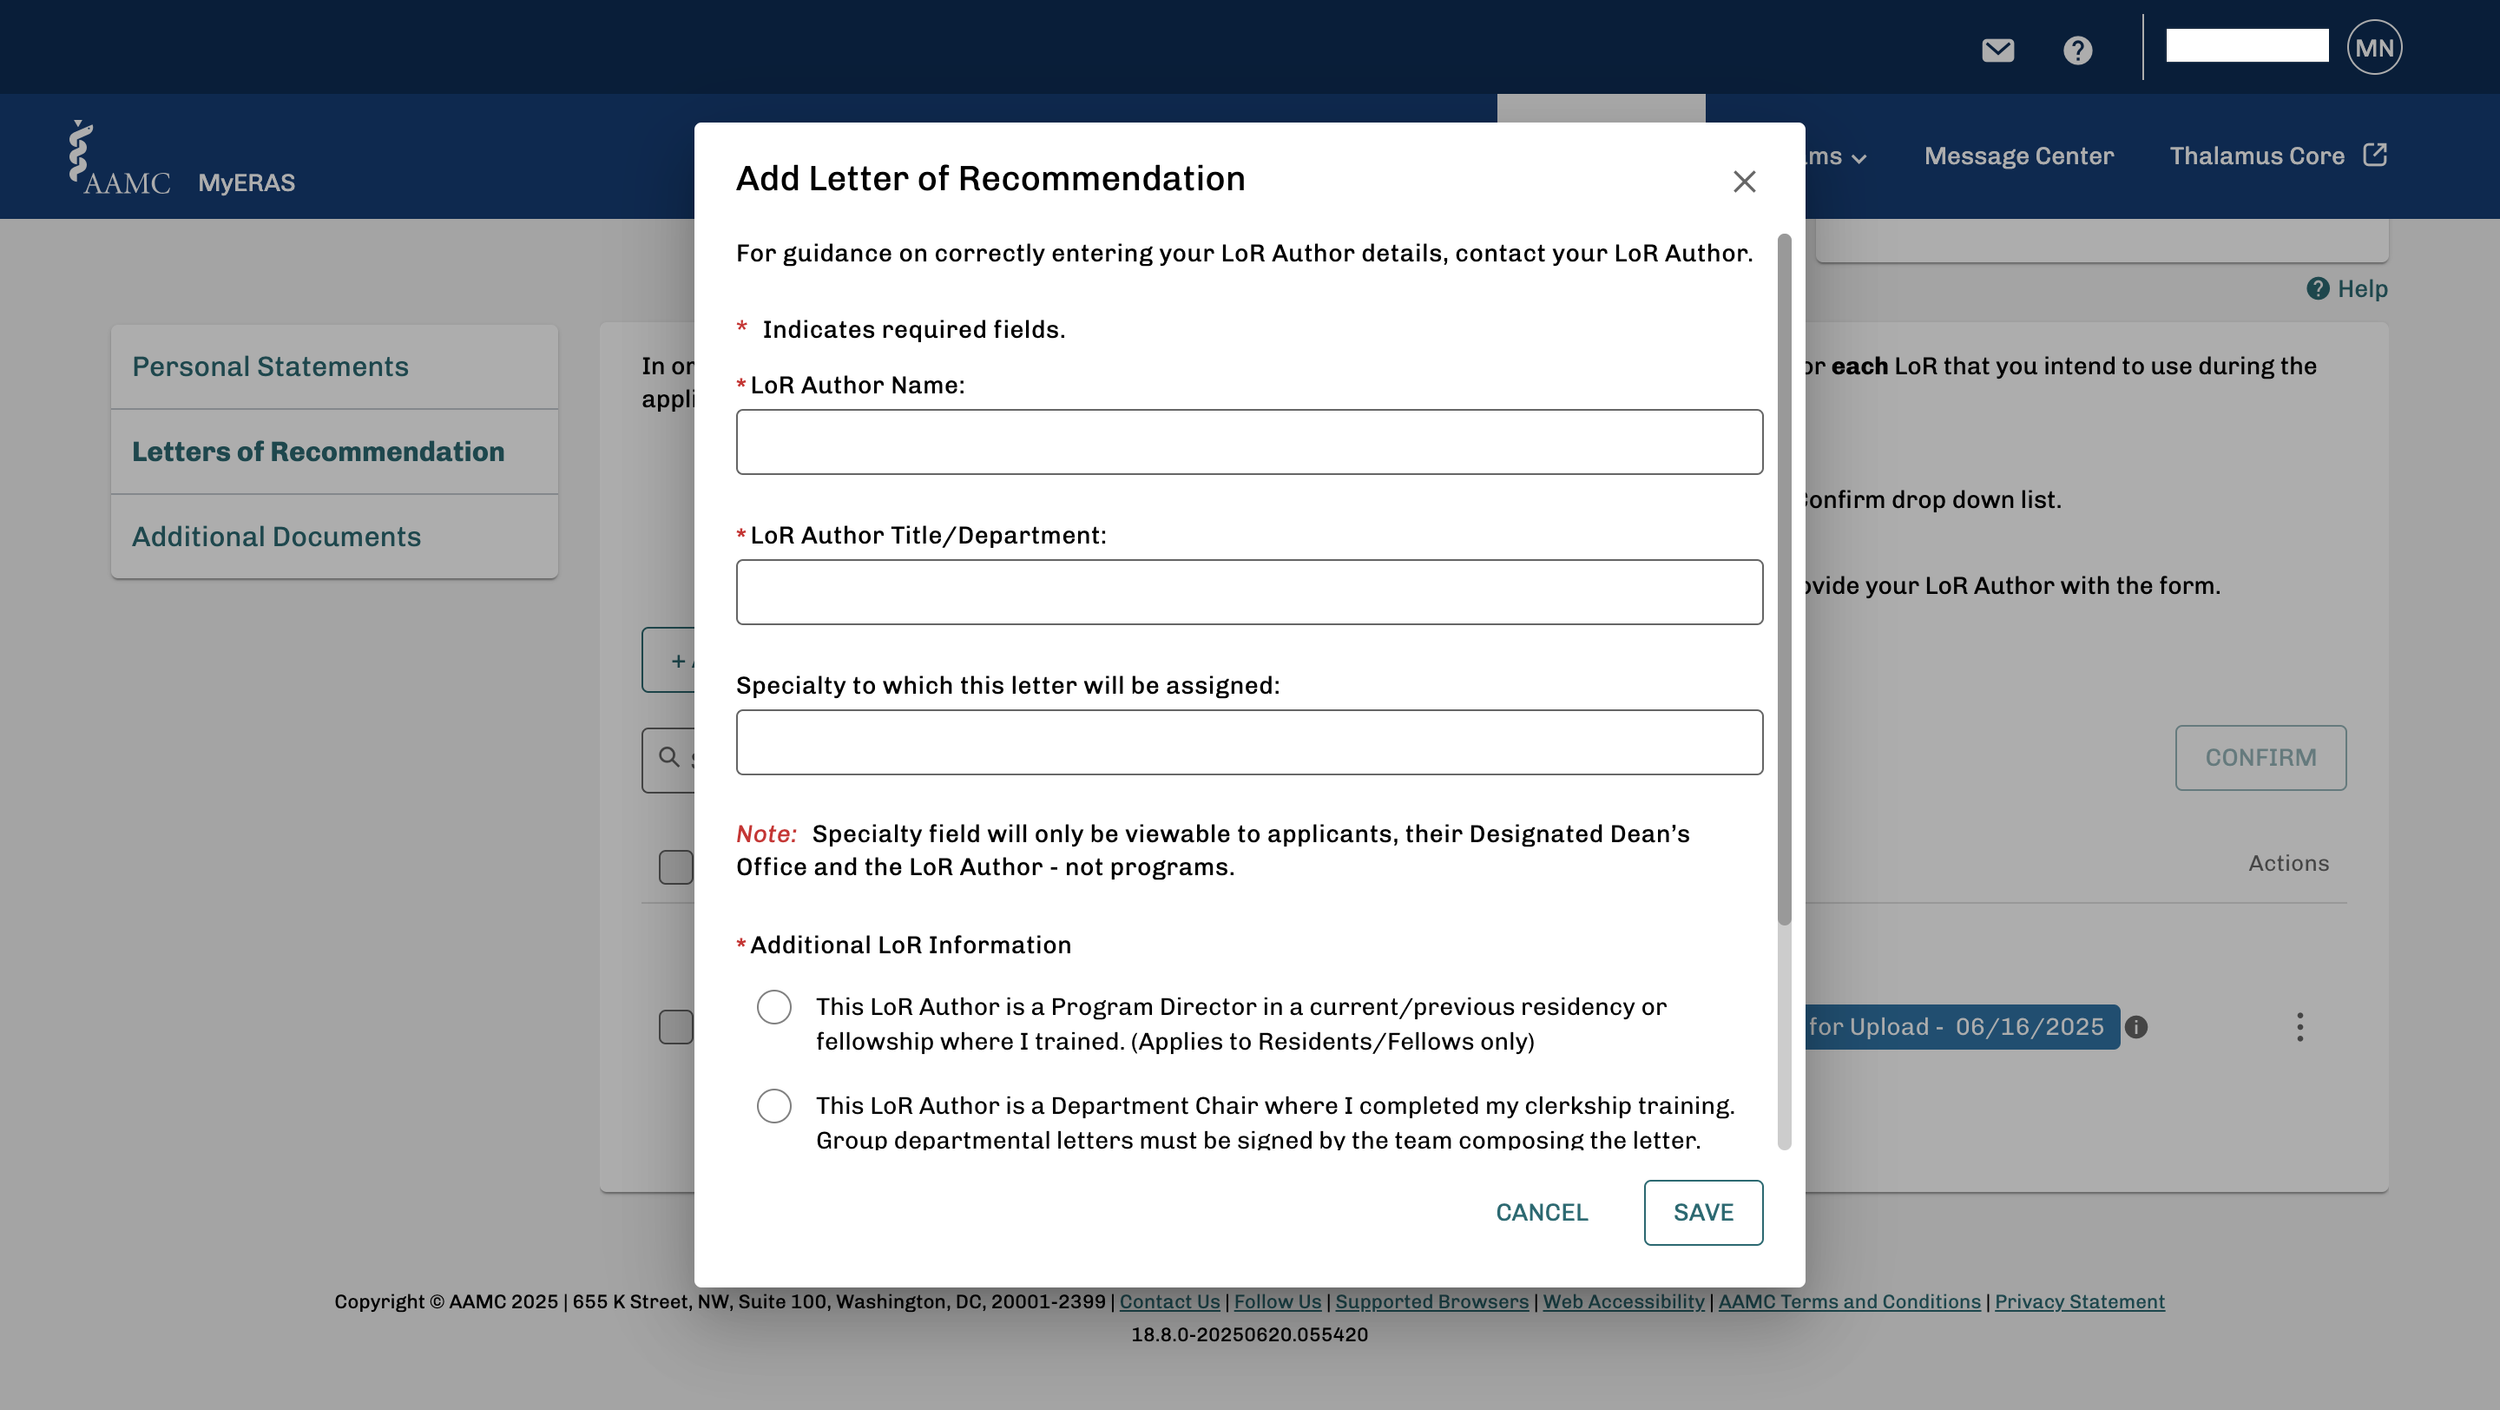
Provide author information. From your dashboard in MyERAS, navigate to the “Letters of Recommendation” section (Click “Documents” at the top of the screen.) Then, you can create a new LOR entry by providing the author’s name, title or department, and specialty. You’ll need to do this for each LOR author you have in mind. You’ll also need to indicate whether you will waive the right to review the letter. It is often recommended that you waive your right to review the letter, as doing so is sometimes viewed as a stronger endorsement.
[screenshot of the screen that pops up when you click “letters of recommendation” in MyERAS]
Generate the letter request. After entering the author’s information, the ERAS system will generate a letter request form. You will then choose to either download the request or email it. The easiest way is to email it, which you can continue doing from within ERAS. The next sceen will prompt you to provide the author’s email address and review the auto-generated request message.
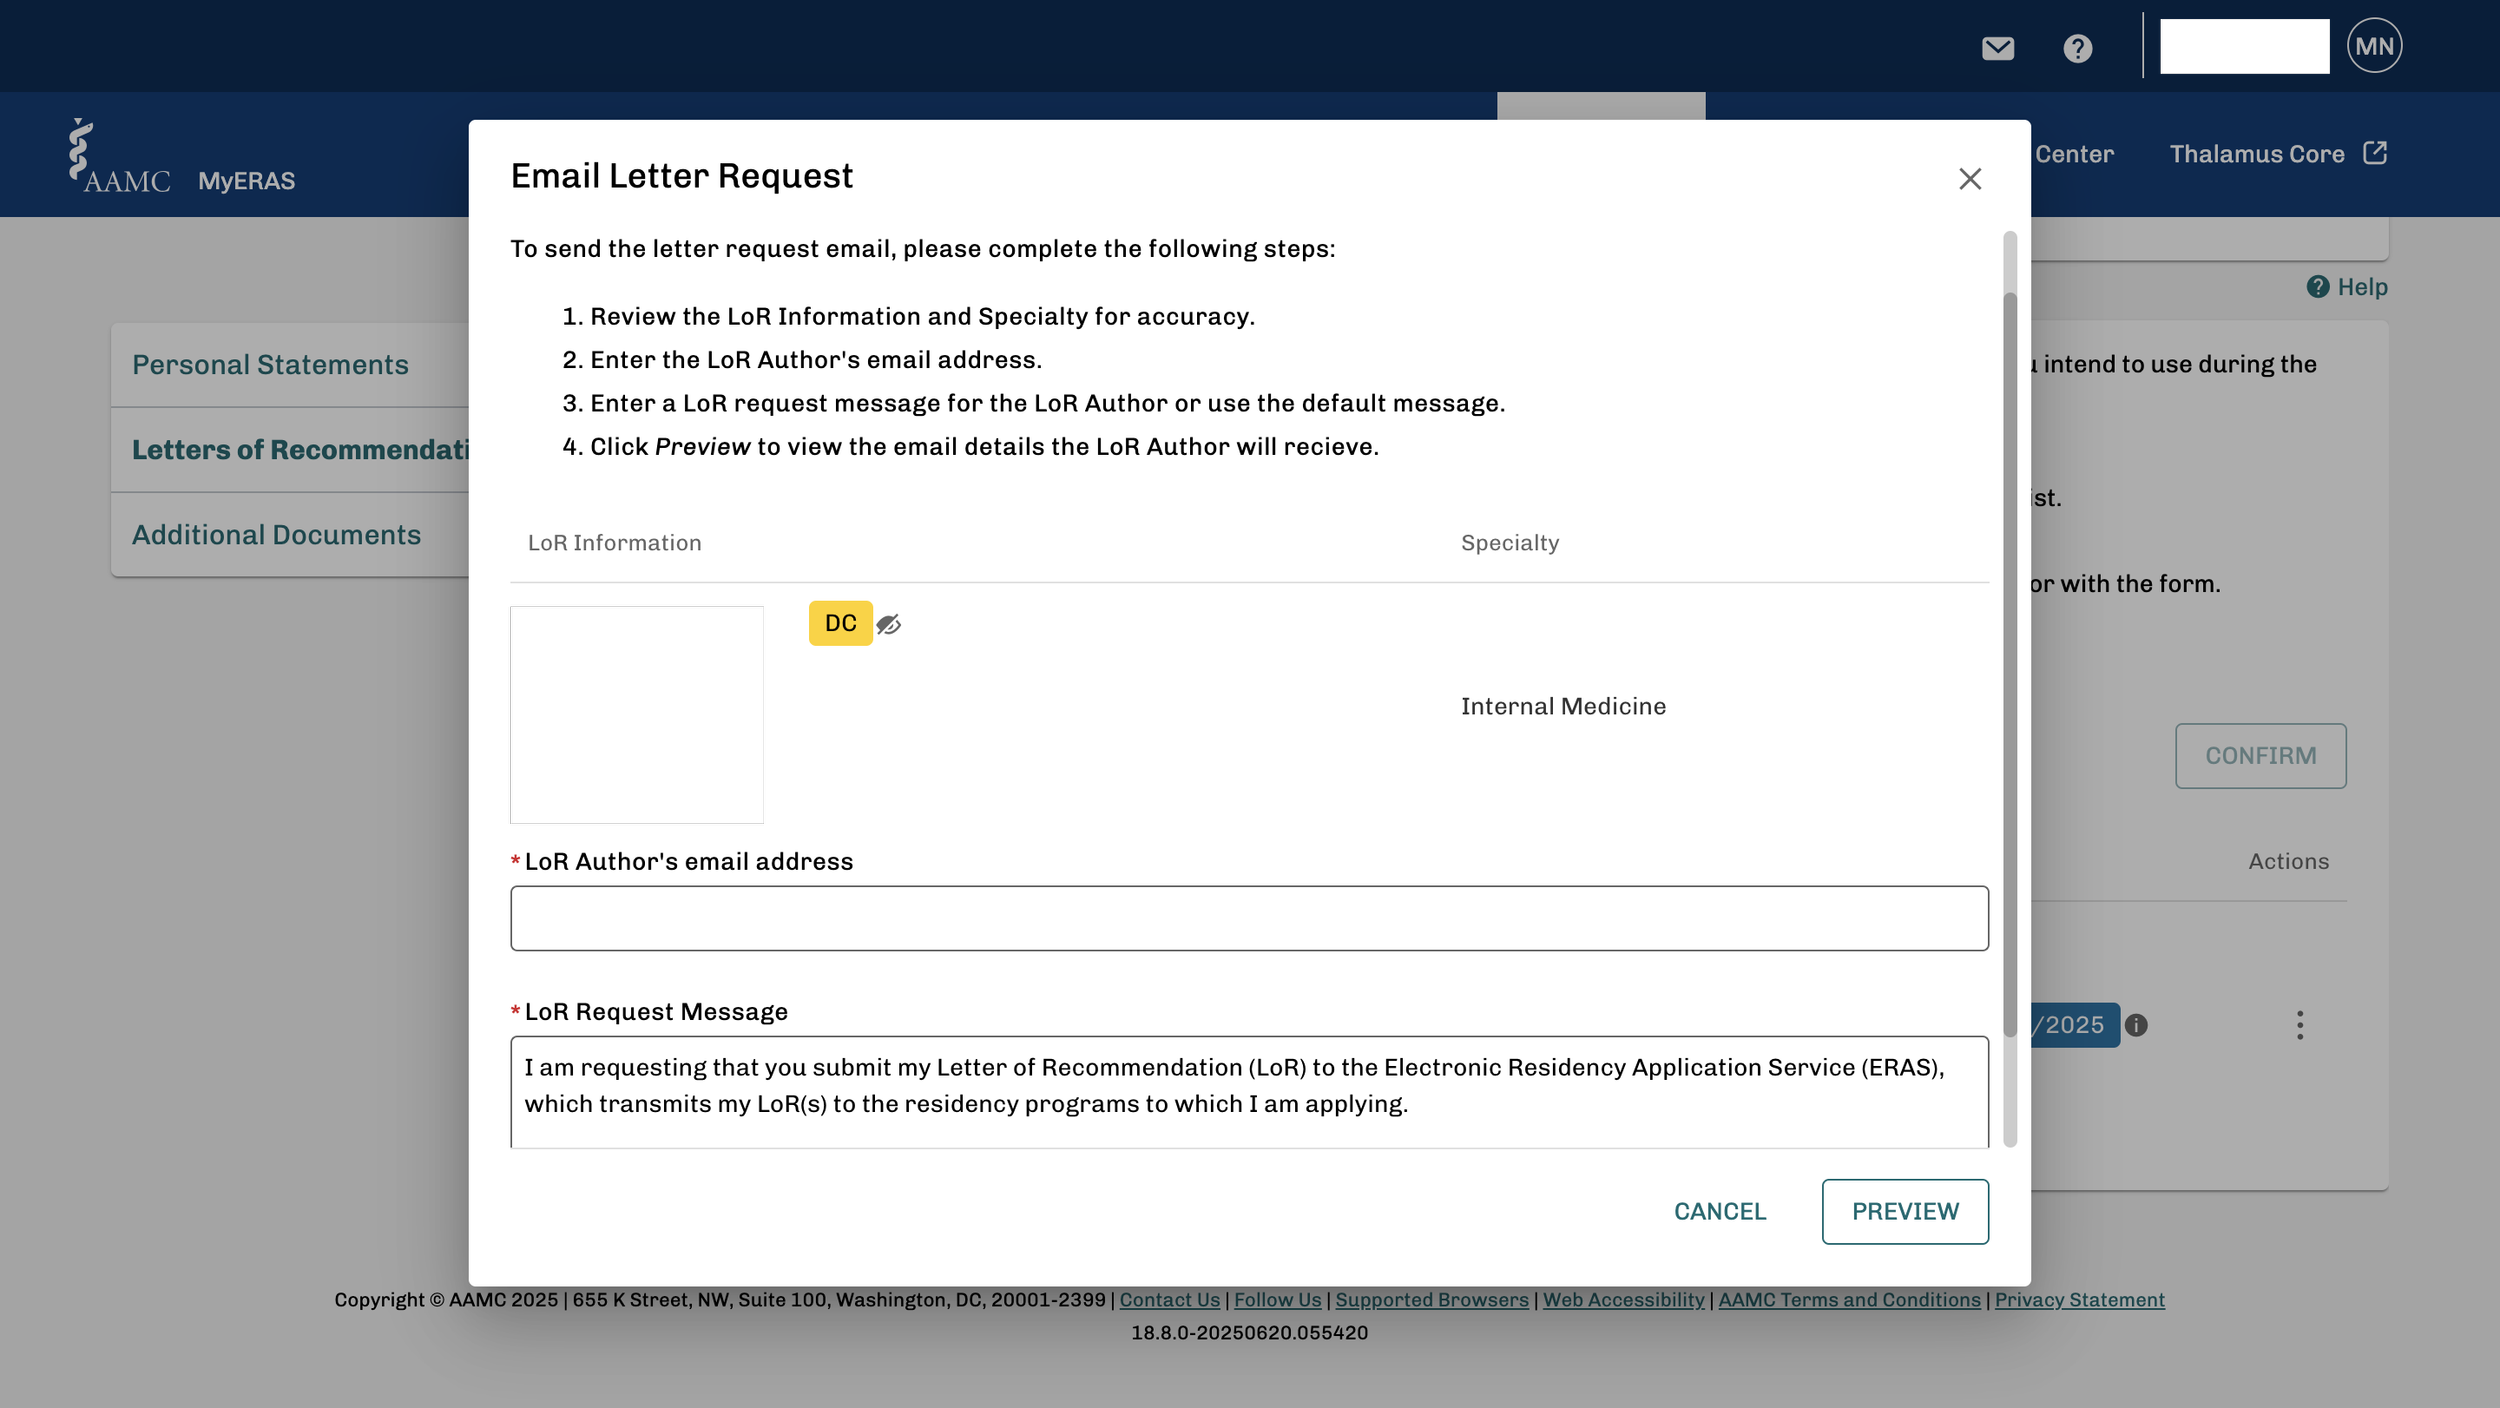
Your LOR authors can use the Letter ID found on the request form to access the Letter of Recommendation Portal which is where they’ll upload their letter of recommendation.
You can then track the status of your LORs in MyERAS.
Looking for medical residency personal statement essay examples? Click here to access over 30 of them, with in-depth analyses of why they work.
Gain instant access to 30+ exclusive full-length residency personal statement essay examples, complete with thorough breakdowns to help you match with your first choice.
----
Part 4: Frequently asked questions about the ERAS application for residency
How do you find out which programs are participating in ERAS?
The ERAS website provides a list of specialties and programs participating in ERAS. If a progam or specialty you’re interested in isn’t participating in ERAS, you’ll need to contact that specific program to learn more about applying.
How do you access the MyERAS portal?
To gain access to MyERAS, you’ll need to reach out to your Designated Dean’s Office to request a residency token. U.S. medical school graduates can contact your medical school of graduation, and international medical graduates (IMGs) can contact the Educational Commission for Foreign Medical Graduates (ECFMG).
For U.S. applicants, your Designated Dean’s Office can begin issuing residency tokens June 4, 2025 (for the 2026 ERAS application season), while the ECFMG can begin issuing residency tokens June 25, 2025.
How much does ERAS cost?
The MyERAS system uses a tiered fee structure. The cost to use ERAS depends on the number of programs you’re applying to within a particular specialty. The first 30 programs of any specialty cost $11 each and 31 or more programs cost $30 each. For instance, if you’re applying to 30 Internal Medicine programs, you’d pay $330 (30 x $11). However, if you are applying to 45 Emergency Medicine programs, you’d pay $780 [(30 X $11) + (15 X $30)].
Keep in mind that you can now use the Fee Assistance Program for ERAS. ERAS. If approved, you’ll receive a 60% fee discount on up to 50 ERAS applications.
When should you submit your ERAS application for residency?
Each year, the AAMC posts a timeline that includes the date (in early September) when you can begin submitting your MyERAS application and the date residency programs will begin reviewing those applications (usually the third week of September). For the 2026 ERAS application season, you may submit your MyERAS application September 3, 2025 at 9:00am ET. Residency programs may begin reviewing applications on September 24, 2025 at 9:00am ET. (These dates apply to IMG applicants as well.)
With this in mind, you should submit your ERAS application anywhere between September 3 after 9:00am ET and September 24, 2025 prior to 9:00am ET. While it’s recommended that you submit your application as early as possible during the application season, all applications submitted during this window will be considered sent at the same time.
(Suggested reading: The Ideal ERAS Timeline)
Can you submit your ERAS application late?
Technically, you can submit your MyERAS application after the September “deadline” (e.g., the date programs begin reviewing applications). However, this is not recommended since programs will already have begun downloading and reviewing applications and may never see yours. Additionally, while the ERAS application season runs June to May each year, different programs have different deadlines that may be well before May. Be sure to check with the specific programs to which you are applying.
What is program signaling for ERAS?
Program signals allow applicants to indicate interest in specific programs for residency. Essentially, they are intended to help programs decide who they may want to invite to interviews. For the 2025 ERAS season, 92% of programs indicated that they used program signaling as they made determinations for who to invite to interview! Additionally, 80% of program directors reported that program signals were an important component when making those decisions.
How do you get help filling out the ERAS application?
For any technical questions, the AAMC offers support, but they cannot and will not offer advice on how to fill out your application.
When completing your application, you may feel on the fence about including a certain experience or in choosing the three most meaningful experiences. Or, perhaps you can’t decide whether you should share about a certain challenge you’ve had to overcome on your journey toward residency. For over 20 years, we’ve worked with medical school graduates as they’ve faced various challenges applying to residency programs, and our experienced advisors are available to provide you with the personalized assistance you need!

About the Author
Dr. Shirag Shemmassian is the Founder of Shemmassian Academic Consulting and one of the world's foremost experts on medical residency admissions. For over 20 years, he and his team have helped thousands of students match to top residency programs using his exclusive approach.